Showing posts with label Layouts. Show all posts

6 August 2011

Album artwork inspiration

Hi

Today I thought I would introduce something a bit different. Something I hope to continue for a few months.
I sometimes find it difficult to get inspiration and sometimes need a picture or sketch in front of me to boost my mojo.

It was only the other day when listening to music did I realise that album artwork is incredible. Such time and effort has been put in to create that music sleeve.I decided therefore to try my hand at using one album cover as the soul source of inspiration for a layout.

It was such fun and really focused my creativity into one area. There are so many oppertunities to try this so i would LOVE it if you would join me once a month to play around with album artwork.

The rules are simple:

I will post an album cover and it is from there you can take inspiration into ANY crafty area you wish. It could be a layout, it could be a card it could simply be a blog post.

Use something from the album cover to inspire you. It could be the colours, the shapes, the photograph, the concept.

The crucial one. Use a song title from that particular album on your layout, craft project or blog post. This could be a really good starting point from which to bounce from.

Leave me a link to your post or project in the comments box so we can all gain inspiration from each other.

You ready to play along?


So. This month is All things bright and beautiful by Owl City.


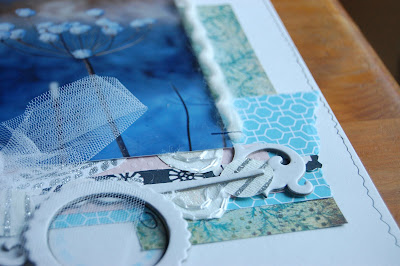
I was really drawn by the shapes and minimalist simplicity of this album cover as well as the beautiful colours. I tried to incorporate this in my page with accents in a darker colour. It was great fun to do and really made me think outside the box.
"Dreams don't turn to dust" is a track from the album and seemed a fitting title for this happy couple.


So, how does this inspire you?

Loves xxx

P.S Album choices are made by artistic capability not by music taste. That said, Owl city are very good.

P.P.S The font for the album was found here.

3 August 2011

I am Blessed// Layout

I don't know if this happens to anyone else but every now and again I print a photo that means a lot. It may be because of the time it was taken, the quality of it or just simply that it is of someone special. I find myself wanting desperately to scrap this photo but because it is so precious I put far too much pressure on myself to create the "right" layout. Sound familiar or is that just me?

This picture of me and the boy was just that. It records an end of my school life, the last time I celebrated with friends and the relationship the boy and I have shared at school for three years. Knowing what I could be like I told myself there were no strings attached with this photo. I therefore went into making this page hoping to have fun rather than do the photo justice.

I have NEVER done a page like this before. There aren't many elements to it, the embelishments are scattered and what is with those leaves coming from the side of the page! That has never happened before! My mind surprised me with what I came up with. It was fun to create a page with a bit of a difference.

Along with a no pressure layout I told myself it would be a no pressure journalling page too. Therefore I steered away from what the picture means and literally let my pen flow writing about
me and the boy.

I was going to call this page I am lucky but only once I had done the journalling did I realise that actually rather than be lucky I was really blessed.

The journalling reads:

Lucky to have had your for over three years, Lucky to feel a part of your family.
Lucky that you have such a sense of humour, I am lucky to have someone who excepts my quirks.
Lucky to be so loved, lucky to call you mine.
But looking at it rather than be lucky I am really blessed.


Has a layout ever surpirsed you in how it has turned out or the direction your journalling went?

Thanks for stopping by

Loves xxxx

P.S I have now framed this layout as it is a new fav. Top tip, Urban outfitters sell 12x12 black frames, two for £18. Go get! I have never found 12x12 frames before now!

19 July 2011

Going Postal

Hi

The other day when browsing blogs I came across this lovely project from Julie Kirk. The aim is to create or blog about something postal and then it will be pinned and shared on Julie's board on pinterest. It can literally be anything!

Well this got me excited because who doesn't love old postage stamps, air mail envelopes and paper parcels wrapped up in string (cue "sound of music")

I did ponder a post on old letters however I stumbled across this old photo when clearing out the photo albums. It was crying for a page and although there is nothing remotely postal attached to it, postal embellishment looked really nice with it.

There is something timeless about decorating a page with postage stamps. The airmail edging on an envelope made a lovely border. I continued the postal theme with my own handwriting and flowers made from book pages. It is quite a simple page but the soft elements give it a dreamy quality which is what I was aiming for.

Because there is no real story attached to the picture, the postal theme gave me some direction and in my opinion makes the layout unified. Reuslt me thinks! Thanks for the prompt Julie!

Thanks for stopping by

Loves xxxx

 P.S I showed the picture to my Mum and she told me it was taken when we were on holiday. Yep, so there is a tennuous postal link. sweet!

10 July 2011

Big Changes

With the end of school come some seriously big changes. I have never been one for change and this is change in  its biggest form.

Not only do I lose a sense of security in not being at school there is also a sense of change for the boy and me. We have been together three years and for most of those three years we have seen each other every day. Next year I am taking a gap year and he is off to uni. I have had to come to realise that it won't be as straightforward as being at school.

Thankfully we have had a lot of practice with being over two hours away from each other on school holidays. Still, it is something that is going to take a bit of getting used to. At first these changes really scared me but I have come to realise that this is a natural transition. Life has to move on and I have to adapt to that.

One form of therapy for this is to scrapbook it. I wanted to make a totally different page with lots of journalling. I wanted to document the memories and good times the boy and I have had as well as addressing the changes that are up ahead and the list of "safety mechanisms" we can use to make sure we still keep in contact.

The page came together very easily. Just three simple pictures and then different journalling spots. I moved these elements around the page until I was happy with the composition. I then added scraps of paper to add colour. Allthough the page is quite girly I tried to grunge it a bit with staples and distressing.

More than anything the page represents a turning point and recognition. Rather than running away from the worries of the next year I have tried to put them down on paper. In a strange sense it is a form of rationality for a very irrational person!

There are big changes ahead but also really exciting ones!

What big changes have you had to face recently? Advice would be grreatly appreciated!

Thanks for stopping by


Loves xxxxxx

8 July 2011

New Layout//pinterest love.

Hi

News flash, I have made a new layout! I didn't realise how long it was until I went through my albums. I think what with revision and exams my mind was not focused enough to sit down with pretty paper. In any case it would have felt wrong not to give a new box of paper the time and attention it deserves!

Thankfully my mojo hasn't totally disappeared and this page came together really easily. For the first time I used a patterned paper as a background. I love the effect. It actually gave me much more freedom to lay off the embellishments as there was less empty space to fill.


I also experimented with "clashing" colours and patterns. I wanted a fair ground feel to the page hence the tickets, raffia ties and colours.

I have also discovered paper bunting. One major love affair. The boy better look out!


On a totally different topic, I have joined pinterest. I know I am slightly late but figured joining in the middle of my exams would be a mistake. That was confirmed when I spent the better part of this morning pinning and re pinning. It is very addictive but also very useful. I can collate a lot of ideas, inspiration and layouts in one place. Amazing and so aesthetically pleasing.

So if you are around please stop by and follow.

Hope you are having a lovely few days.
Thanks for stopping by

Loves xxxx

12 April 2011

Sketch challenge for Sarah's cards.

Hi

I want to share a Layout today that I have been making the last few days in stolen moments from revision!
I followed the sketch on Sarah's cards blog which can be found here.

I don't tend to use circles a lot in my pages so it was great for me to move out of my comfort zone. I flipped the sketch 90 degrees clockwise and worked from there. I started making the Layout with just a circle base but after finishing I found it needed a bit more depth to stop it looking crowded so I stuck it on a sheet of Kraft.

 I have been meaning to make a page about blogging for so long and needed the perfect picture before I started. My old Blog header was perfect and had such deep colours so it was fun to pair it with these pale colours.

I tried to include aspects of my blogging in the elements of the page. therefore like my background i focused on it being shabby chic. I put buttons in there to emphasise the love of sewing, the stacked up paper for lots of ideas. Letters to emphaise all that typing and paint for a tad of mess! A few butterflies crept in there as well! Oh, and top tip, to make lovely glossy embellishments, coat them in nail varnish (I used a light bronze on the butterflies) Works a treat!

Thanks for stopping by

Loves xxxx

27 February 2011

A new layout

Hi

It's back to school today so off to do some packing- and hopefully pick up everything of mine that is littered around the house!

I want to share a layout I made over this holiday. I love kraft paper so really enjoyed making this layout. The lace effect background is hand cut and was really easy to do. Inspiration came from here.

These are some of my favourite october afternoon papers that have featured on several layouts- apologies!


Hope you have all had a lovely week- posts may be a bit here and there from now on what with school computers! Thanks for stopping by

Loves xxxx

7 January 2011

Snow Layouts

Hi all

I know there haven't been many posts recently but I have been at the boys house. It was epic. Three days of no internet ( he lives in the middle of nowhere!), laughs, smiles and plenty of cuddles. Lush to just enjoy each others company outside of the school mahem.

 So.. this holiday my mojo really came back and with some lovely new supplies and I I have made several layouts. I'm going to share two of my favourites. Both have pictures of us in the snow but I tried to move away from the typical "snow" colours and christmas. As a result, they document the fun we had rather than the fact that there was snow. So...
This picture was so cute so I edited it in Picnik to get a vintage feel to it. That was really the basis for my layout. I stuck to a fairly neutal pallette starting with the lovely embossed cardstock. I don't often use large pieces of patterned paper so this was a fun challenge for me taken from a sketch. I loved the checked paper from October afternoon but wanted to grunge it up so I sanded the edges, punched holes down one side and then cut into it to make it look like notepaper.

I have been wanting to use the large tag for ages and it looked great poking up from the picture. I then added a collection of embellishments on the right, with handmade flowers, cut outs, chipboard and ribbon. I also found in my stash a lovely hambly lace overlay which I think I have falled in love with. It gave just another detail on the vertical paper.
This has turned out to be my favourite layout for a long time. I decided to really let the picture stand out so kept the layout minimal. The patchwork idea I took directly from a sketch. It was very easy to do as I chose double sided paper from the same company so they coordinated. This was a layout where the sewing machine really got a work out! I stiched all the patchwork together, the border and the butterflies.

The large letters pull the design from being too linear. At this stage the layout looked good but not finished. I therefore cut out several butterflies and circled the title. I then had the mad idea of using small circles as a border. Sticking them on took forever! A few strips of patterned paper and ribbons complete the layout.

I loved making these two so hopefully a few more layouts will come soon. Back to school on sunday. grrrr a few more posts till then though including some of my lomo shots that came back from the printer today! epic!

Thanks for stopping by

Loves xxxxxx

5 August 2010

A bit of crafty loveliness

Hi all!

I am back from very sunny and very lovely America. We had a lovely time together as a family, ate lots of scrummy american food, met many lovely people and in my case got severely bitten! ouch! I have literally hundreds of pictures and will share tomorrow but today I thought I would show a few pics of a mini book I have been working on for a friend...

I wanted to make something for a friends birthday so decided on a small mini book with prettty pictures and lots of memories.( I am praying she isn't reading this!) I always try and do something a  bit different for someones birthday and a mini book is so personal and unique and nearly always brings out a smile!
This style of mini book is so easy to make and looks really effective. I always have certain things that I want a mini book to be. First and most importantly it has to be tactile. An album goes on your coffee table and yeah it is meant to be handled but not in the same way a mini book is. A mini book has to be held to open, you interact with the pages. Therefore I try and add as many textures as I can...

Here I sewed around the acetate pages, used twine and string and wrapped the whole book up in soft chunky wool!

The basic formula (is that the right word, sounds a bit too much like maths!) for this book was that I chose 4 pictures of my friend. These pictures I sandwiched between acetate and pretty paper and then sewed around them, adding embellishment on top of the acetate as well.

I then found a load of old tags (save ones from clothes, they're so strong and many are really pretty) and decorated them adding rub on words to relate to the message I was going to write on the back. I punched a hole in every page and threaded the whole lot onto a book ring. The result is a book with all different sized pages that looks really quirky!
I personally prefer a book that hasn't regular sized pages because i think it makes it more exciting being able to see what is coming next, but really that is just my preference! I finished the book with some little tags and sentiments.

Although it isn't big I really like the end result and managed to use all my favourite scraps of paper i had been hoarding up! (oooh another good thing about mini books is that you can make a whole one and not break into a new piece of paper! Gotta be good!) I also used some little bits and pieces I found in America. Don't you LOVE the woodgrain stamp I found!!!!

So..the Abi forumula for a mini book. Hope you enjoyed seeing how I scrap. This really is just my way of doing things and certainly isn;t the "right" way if there is such a thing!

Hope everyone has had a fab week, i need to catch up on so many blogs! Thanks for stopping by again!

Loves xxxxxxx

17 July 2010

Boy meets Girl

Happy Saturday
Have been doing my most recent page for Shimelle's class, Love your pictures, love your pages. The sketch immediatly grabbed me because it used four square photos. I have never done something like that before so I thought..why not have a go!

(I'm sorry, this is another post about the boy, you can switch off now if you want!). I absolutly love scrapping pictures of the boy. probably because I have so much I want to say and two because I get to gaze at his photo and not feel guilty! he he!

If you have never used Picnik, please try it out. I made a photo collage of the four photos in seconds and even managed to add this yellow filter which makes the pictures look somehow timeless...
I chose some of my all time favourite pictures of him and me, cut them out and layered them up...
The layout isn't actually this dark. My camera was having a funny five minutes! I love how it turned out though. I wanted to keep to a tight colour scheme and to chose colours that felt elegant to match with the black and white photos. I kept most of my embellishment to the middle of the page with the pictures. For me, there is a lot of white space on this LO, slightly scary as I feel I want to fill it with something!

Although I wanted to keep the page elegant I also wanted an element of fun. hence the note paper and the type writer title!

The journalling reads:
2 years later, you still make me laugh, you make me so happy and you still humour my need for photos!

Perhaps because of its simplicity, this has turned out to be one of my favourite LO's with all my favourite pictures on it!

A few more details:
I am loving the use of twine at the moment to grunge up a layout slightly!
The colours are better in these photos.

Hope you all have a brilliant weekend. I am nannying for a bit next week so posts may not come as frequently! Oh and I would love some advice. I changed my blog to a three column the other week, but am not sure if I like it, what do you think?

Thanks for stopping by!

Loves xxxxxx

16 July 2010

Another Layout

Hi
Ok, this is a bit later than billed as yesterday afternoon, but hey, kept you all in suspense about the latest LO!
.
I am kind of worried because this is the third layout in a week. Something must be wrong with me! he he!
.
So..this is one I made with some fairly recent pictures of my brother. (The middle one, not the little one). I was struck with how grown up he looked. We have such a good relationship with each other, being so close in age and he has now realised that cooperating is the best way to appease me when it comes to photography!
Again for me it is relatively simple. At the moment I seem to be loving using a select choice of patterned paper and then including lots of little details in the embellishment. One thing I love about this layout is the blue border. So easy to do. Get a plastic ruler and a paint dabber. Paint the edge of the ruler evenly in paint and then press on the edge of the cardstock! simple!
.
I always have a problem trying to make a boy page look sophisticated and not too "frilly". Thats why here I used staples to hold the paper in place and string rather than ribbon. Adds a bit of grunge I think!
.
A few more details:
Thanks for stopping by. Hope you all have a great day!
Loves xxxx

13 July 2010

If there is one thing...

Hi All
I have a new layout to share, exciting!!!! two in one week has to be a first for at least a year! eeep! anyway in response to the title..
.
If there is one thing that I would like to tell everyone then its BACK UP YOUR FILES.
.
Yesterday I put my memory stick in the USB port and it didn't register.
I thought "ugh oh!" double clicked on it and the heart stopping message came up..
" Your memory stick isn't formatted"
I had a minor argument with the computer at this point, assuring it that it was.
It then proceeded to tell me that if I carried on with formatting it " all data will be lost."
After a mad rush to the laptop in the hope that the home computer was just being weird, I realised that my memory stick may be dead.
My wonderful father after calming down his panicking daughter installed some data recovery software and we got some of it back.
.
I am just so thankful that one, all my photos were backed up on the home computer and two that it is the end of the year therefore all coursework on there and module images for photography have been handed in. What a blessing. I don't know what I would have done if it was the middle of the school year. The thought sends me out in a sweat! So...back up your stuff. EVERYTHING!
.
So, the layout. I dare you to look at this and not laugh...
It was a very easy layout to make. Compared to my normal style it hasn't got as much embellishing etc but I really like it. I made my own mist spray by mixing paint and water in an old body spray bottle! The photos on this layout are purely coincidence. In the second one my mum was just talking but it ended up looking like such a look of shock at by Dad kissing her. These photos always make me crack up cos it shows the lovely relationship my parents have but also captures some of the fun we have together as a family. Its the kind of picture that should have some victorian caption under it!
.
Will hopefully stop back soon with more crafty goodness!
.
Loves xxxx

11 July 2010

New LO

Hi All .
Shock horror! A layout! Has to be a first for what 6 months??? Eeek! Am loving Shimelle's class because there are so many talented scrapbookers out there and such inspiration. Also a quick thank you to those who left such lovely comments on the pic I edited of me and the boy. If anyone stops by here and doesn't do the class, it looks like this:.
Anyway, back to the LO. This is one I did based on a sketch. As usual when I work with sketches, I don't follow it very closely, but find it really useful to kick start my creative side!
The LO documents my relationship with a little girl in year seven and how much she means to me. Also the fact that she reminds me of myself at that age as we have so much in common! I wanted to make the page sweet and girly but also have a school room feel, hence the letters and the lined paper. I love to layer up chunky embellishements, so here covered some old clothes tags with patterned paper. (you can probs still see the Jack wills one poking out though!) I made the material flowers with the same tutorial I posted a few months ago. .
So,there you have it, a new layout. Will stop back soon with more crafty goodness! Am loving this whole holiday bussiness! he he! Hope you've all had a good weekend?
.
Loves xxxx
PS is anyone else having problems with blogger not registering line breaks? really annoying me!

19 February 2010

Scrappy goodness

Hi all. Ok so perhaps the LO's didn't get posted the next day but hey. One still needs to be finished and I have to make a birthday card for the boys mum (brownie points here! Lol! Only joking, she's lovely and i'm happy to make her a card especially as she is taking me out to lunch woooh!)
So.. I thought i would do a bit of an anatomy of a page in the style of Abi. I don't normally go in for double pages but when I have a lot of pictures that just have to be scrapped it can be helpful. Also in a really weird way double pages use up less supplies cos each side has to balance so u don't feel the need to fill up the space as much as on a single. Well..that is my theory anyway! So here it is, my double page..Quite fitting that we had a dusting of snow today! Ok, The biggest thing I find when creating a double page is trying to make it look like one thing, rather than two seperate pages with similar pictures. By using the same paper and sticking to a limited colour scheme it is clear the pages go together..
The left hand page The right hand page
On this layoutI wanted the emphasis on the pictures rather than the fact it was christmas so I used a wintry colour scheme rather than a christmassy one. I also wanted to break away from the traditional slightly, so used baby pink as well. personally when I create a double page, I find that when layering papers what was horizontal on one side works well vertically on the other. For example take the graphic blue paper, on the right it is horizontal but on the left vertical. It makes the pages correspond with each other but still look individual.
Next, I wanted the pages to have similar design elements. In this case it was the trees which I rather like! Lol! They indicate christmas and emphasise the wood in which the photos were taken! (Aslo they were nice and simple!)
Obviously on the left hand side I used a larger tree because there was more white space. This creates a focal point for the rest of the page and leads the eyes to the trees on the next page.
I always like my pages to have something that draws the elements together so that they look connected. Here I used yarn stapled horizontally and vertically which also adds texture.
Embellishing on this page was kept to certain areas. On the big tree I wanted to give the effect of sumptuious decoration so layered up paper, chipboard and glittered paper. I then wanted to echo this on the right hand page so it look balanced. Therefore I added a line of similar embellishment...
Finally to offeset the graphic title I used my own handwriting to journal...
So there you have it. This is completly subjective, just my thought processes as I make a layout and what I try to do to make it look balanced. How do you think through a page?
Off topic of scrapbooking, look what arrived in the post yesterday... my upgrade! Yes my new toy was part of the reason there was no post yesterday eeek! You know what is most exciting about it? It can plug into a computer and registers as a mass storage device, so basically u can load any file to it in like 3 seconds!!!!! My gallery is now full of photos and layouts!!! happy times!
Anyway, back to school soon, grrr..
thanks for stopping by!
Loves xxxx

7 January 2010

The Studio January challenge

Happy thursday!
Hope you have all had fun playing in the snow. This post is for the January challenge at The studio. The challenge is to create a layout with 3 photos, using lots of white space and about something you fear.. if you haven't entered yet do cos it's great fun! Well..this is my layout:
There is such a lot to say about this that I thought I would just take you through the story of making it...bare with me!
Story behind the photos: This page is about The boy and the serious amount of medication he takes because of his asthma. Honestly it scares me so bad. I have never had to take daily medication so seeing someone I love take several inhalers and pills each day is just out of my radar and as a result I freak over it far more than he does ( he is so laid back it's unreal!) journalling reads.."I think I am more scared of your asthma and mediaction than you are. I know you will be fine but seriously, 3 inhalers and pills each day freaks me out!"
To be honest I never, ever scrap with a lot of white space and when I started this layout i found out why...flip is it difficult?! So basically this layout could be how white space freaks me out! But..after serious juggling with page elements I came to this. I wanted to keep a minimal colour scheme and the pictures to stand out. Sorry they are such bad quality but cos of the snow there was no way the pics would arrive in the post n cos of going back to skl, this had to do! You know what I found the hardest? Getting the page to link. Cos of the huge amount of white space I had to make sure the Title looked like it belonged to embellishments hence the leaves and the paper at the top left. Looking at it now though I am really happy with how it turned out. I loved using a long title for once and I loved dabbling with the paint and ink!
I know the pics are awful so here they are how they were supposed to come out if the printer was working grrr....

Sorry but just looking at the amount of meds he takes freaks me out! This is the reason I try and stay away from him if I am ill (much as it annoys me!)

Sorry bit of a long post! Still lots of snow here which is making me happy! Enjoy your day, thanks for stopping by

Loves xxxxxxxxx